Three years ago I blogged
about my conversion of an automatic pack-film camera to a fully
manual setup(check out this blog entry for a more thorough how-to:
http://www.lofianddiy.com/2016/10/polaroid-conversion-my-messy-manual.html
). It was my first
attempt. I was pleased with the results, as it was a camera with
personality. It looked like the Frankenstein it was-, a combination of
several camera parts with junkyard appeal. In an effort to thin the
herd, I sold this lovely little junker. The new owner sent me some
great pictures that he shot with the camera. I was proud and glad
that the camera gave another joy like it had me.
But
I missed that camera. I could toss it in a bag with little regard for
its safety( so different from the way I treat my 195). There was also
a connection to the fact that I had put my own personal touch to it.
I had modified it- tricked it out- like some rat rod car.
I
kept busy with other conversions: Two 110 to pack film
conversions (http://www.lofianddiy.com/2018/10/late-to-party-or-polaroid-110a.html) and a successful Polaroid Spectra to Acmel Forensics
transplant operation later(http://www.lofianddiy.com/2019/03/crazy-space-shuttle-forensics-acmel.html), and I wanted to have another go at the
automatic to manual conversion. I recently bought a small lot of pack
film(very expired fp100c) and they threw in a poorly constructed junk
conversion from a tired 100 body with bellows that looked like swiss cheese and a
lovely 127mm Rodenstock-Ysarex lens.
Tinkering
is an addiction, and I have been jonesing for this project. As an
added motivation, I will not get to shoot with my 195 for three
months. It is on display with a third of my collection in a show
about collections in the Kennedy Museum of Art. So I took the lovely
lens off of the junk conversion and dumped the rest into a parts bin.
This
time, I set about with an aesthetic vision. I still wanted the steampunk rat rod look, but a bit more refined and unified than my first
attempt. This one would be shiny metal and black, to go with the
lovely lens I lucked into. In the three years since I blogged about
my last manual conversion, I have cleaned, tested, enhanced, and sold
a couple hundred cameras. This has given me a parts graveyard that
would likely be the envy of any Polaroid geek.
I
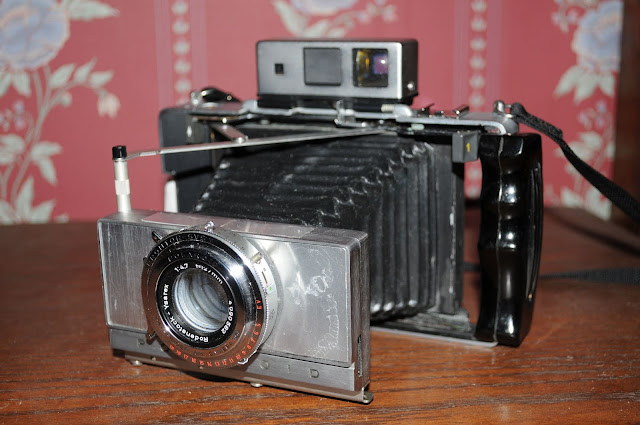
built this new camera on the foundation of a Polaroid 250 Automatic.
I swapped out the bellows with a nice black one( for information on
how to swap bellows see
http://www.lofianddiy.com/2017/01/polaroid-packfilm-bellows-transplant.html
) and added a full
view Zeiss-Icon viewfinder. Most Zeiss-Icon viewfinders have a tiny
viewing port, but there were some 250s that had a larger viewing port
for people who wear glasses. I attached a Polaroid #128 timer to the
back with permanent double-sided craft tape. You will note that I put
it on the right-hand side as you look at the back. My first-timer was
mounted on the left side and stuck out against my face when I used
the viewfinder- live and learn! I added a cold shoe that I took off a
flash bracket with a combination of screws and liquid weld. I gutted
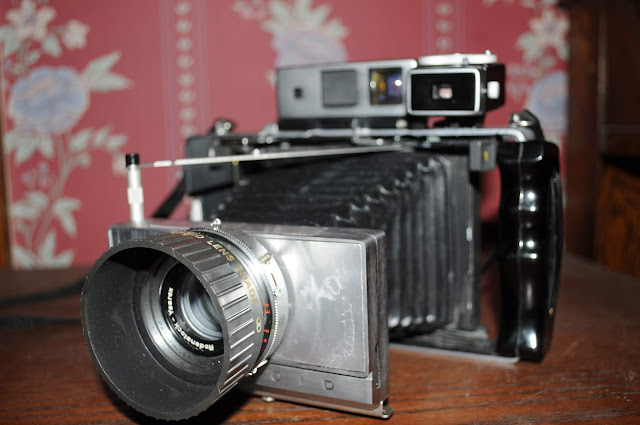
the front standard and mounted the 127 lens. In addition to being a
very sharp lens that was originally from the Polaroid 110a roll film
camera, this lens has the added benefit of the accessories designed
for the 110a, like closeup diopters +1, 2, and 4, as well as a yellow
filter, polarizer, and a hood!
But
the most drastic change was the grip I built into the frame of the
camera. Since I no longer needed batteries for my camera, I took off
the battery door and the built-in plastic hand grip. A little
dremeling later, and I mounted a handgrip from the flash bracket I
salvaged. Then I made a custom cover for the whole package out of an
automatic 450 cover. The 450 cover is designed for the Zeiss-Icon
viewfinder and has the added benefit of a cutout for a cold shoe. I
dremeled and folded it so the handgrip would still be accessible
even when the cover is closed. I made the cover form fit the new lens
by putting on the accessory yellow filter to protect the lens, and
slowly coaxing the cover to the shape while getting the cover hot
with a heat gun. This is scary, but if you take your time it will
work very well. I chose the yellow filter knowing that if I hurt it I
would not be too disappointed, but there was no damage to the filter
and the camera itself wasn’t even warm. I let it sit for an hour
fully clipped in place to make sure it would not return to its
original shape.
I
found a nice and simple Honeywell flash in black and chrome, and
after a bit of cleaning the contacts with an eraser head, it fired up
the capacitor quickly. It took me a lot longer to find the
proprietary flash cable, though. Thank goodness for my camera
salvage! I really wanted it to have the Polaroid #628 light meter,
but I didn’t want to use the one from my 195 kit. I have a few
broken 628s, so I set about fixing one. This was probably the most
time-consuming part! I just took it apart a dozen times tweaking this
and that until it was fixed. By the way, this method can work for all
kinds of stuff ( The only caveat is that you have to watch out for
high voltage capacitors, as they can release deadly energy.).
I
am really pleased with the results. Not too polished, but quite the
looker. It is also the most ergonomic pack film camera I own, and my
new favorite...until my next fix!


Very Nice! Bought a 180 for 10$ had more fun w/ camera than any camera I’ve owned
ReplyDeleteWow- ten bucks! That is amazing for such a great camera!
Delete